The Ultimate Heroic WotLK Classic Dungeons Guide
[lwptoc depth=”2″ title=”Heroic Dungeon Guide WotLK Classic” backgroundColor=”#232529″ borderColor=”#289bff” titleColor=”#ffffff” linkColor=”#27b7f9″ hoverLinkColor=”#b1e4f9″ visitedLinkColor=”#0068e8″]
What you need to know about all the different heroic Dungeons in WoW WotLK Classic
In this ultimate Wrath of the Lich King (WotLK) Classic Guide, you will learn everything you need to know about the Heroic Dungeons. We also cover strategy and other useful information about each dungeon. So you”ll be well prepared and get through each of the heroic dungeons listed below with ease.
Ahn’Kahet
Five relatively easy bosses await you in Ahn’Kahet. The trash groups are also not too hard and have no special abilities. The entrance to this dungeon can be found in the Dragonblight. Its entrance is relatively hidden under the ground, and you can reach it through a cave entrance. The coordinates 26/49 will take you to the entrance. In front of the entrance there is also a daily quest. You can accept the quest “All Things in Good Time” from Kilix the Unraveler.
Overview
![]() Emblem of Triumph: 5
Emblem of Triumph: 5
![]() Time required: 30 minutes
Time required: 30 minutes
![]() Item-Level: 200
Item-Level: 200
Elder Nadox
For this boss, the first steps are the hardest. Especially on the bridge, you”ll quickly wipe when stragglers lure the groups to the sides or rush forward too quickly. The fight against the Elder Nadox, however, is very easy. Once per battle, a guardian appears with a few swarms. As long as this guardian is alive, Nadox is immune to all kinds of damage. Thus, this guardian has the highest priority. So, first defeat the guardian, then the swarms and finally the boss Nadox. Make sure that you protect the healers and that they don’t get focused by the guardian.
The sullied Terrace
Absolute caution is required here. You have to pull the groups one by one. The first group is particularly tricky, because the Frostbringers stop while casting. Therefore, first eliminate the Haunt and then the Bonegrinder. You must first eliminate all the groups on both platforms and then activate the two Ancient Nerubian Devices. After that, the way to the second boss Prince Taladram becomes open.
Prince Taladram
Watch out for his attack ” Vampiric Embrace” in this fight. It is particularly dangerous. It deals 2,500 shadow damage to a random player every two seconds for 20 seconds. The affected player is incapacitated and cannot be healed. You don’t have to worry though, because this effect can also be interrupted. Thanks to this heroic dungeon guide for WotLK, you know exactly how. You have to deal 40,000 points of damage to the prince as quickly as possible from the moment he casts this spell. Besides, the prince Taladram also summons flame spheres, but they don’t do much damage.
Jedoga Shadowseeker
You must pull all groups one by one. If you have two or more groups, chaos can quickly ensue. Then, after the stairs, take the right path and you will come directly to Jedoga Shadowseeker. The boss itself is not a challenge. When Jedoga flies up, you just have to pick the follower. This one shouldn’t reach the boss, otherwise Jedoga will cause triple damage. It is also important that you always get out of the attack “Thundershock” in time.
Amanitar
In heroic mode, there is an additional boss in the southern section. This boss is called Amanitar. He summons two different mushrooms in battle. These then hurl poisonous lightning around. There are also healthy mushrooms, next to which the tank should stand. By doing so, he gets the buff “Laden Mushroom”, which protects him from the debuff “Mini”. So, always stay away from the poisonous mushrooms!
Herald Volazj
Before the final boss you have to kill the three forgotten ones. If you stand too far away, you will get a Shadow Crash from time to time, which causes a lot of damage. Herald Volazj shoots shadow blots and brings up copies of your party members against you with his ability “Madness”. Only when you have destroyed these copies, the herald is attackable again.
Azjol Nerub
Also, like Ahn’Kahet, the Azjol Nerub dungeon is located in Dragonblight. The entrance is right next to that of Ahn’Kahet. You will encounter the first boss relatively early in the dungeon. You only have to defeat two groups of enemies and three guards. Be careful with the guardian groups though, they cause enormous poison damage. In addition, these guards can also spin your teammates into a cocoon. You should destroy this cocoon as soon as possible with a few strikes. Further in the WotLK heroic dungeon guide, the individual bosses are described.
Overview
![]() Emblem of Triumph: 3
Emblem of Triumph: 3
![]() Time required: 15 minutes
Time required: 15 minutes
![]() Item-Level: 200
Item-Level: 200
Krik’thir the Gatewatcher
Tank and Spank: The tank grabs Krik’thir and everyone else hits him. In the middle of the fight, many small swarms appear that you can easily destroy with area-of-effect damage. If Krik’thir goes into a frenzy at the end, the healer has to be careful. However, this is really a very easy fight.
Hardronox
Follow the walkway to Hadronox’s lair: a large room with spider webs. Finish off the three groups of mops and then just wait for Hadronox to come up from below. Hadronox is also a very easy boss. However, make sure you don’t get stuck in the acid clouds, and use all opportunities to remove the poisons. The healer should focus on the tank when it is affected by “Armor Penetration”. The best choice here is the Holy Priest with his ability “Prayer of Mending”.
Anub’arak
Follow the instance path, which is now completely free of enemies. Then you have to jump through a hole and land in deep water. Finish off two more guards and you’re already in front of the final boss. Anub’arak will disappear into the ground several times in the middle of the fight and summon a minion, which you have to defeat. If the ground under you starts vibrating, get out of it quickly. Also, make sure you never stand in front of the boss when he casts “Pounding”.
The Violet Hold
The entrance to the Violet Hold dungeon is located in Dalaran between the Fountain and the Flight Master. In this dungeon, a total of 18 portals and three boss enemies can be seen. You can also encounter seven different bosses. In the next section of this WotLK heroic dungeon guide, you will learn which bosses these are and what you have to be particularly careful of.

Overview
![]() Emblem of Triumph: 3
Emblem of Triumph: 3
![]() Time required: 20 minutes
Time required: 20 minutes
![]() Item-Level: 200
Item-Level: 200
Ichoron
Destroy Ichoron’s protective water bubble. If he summons elementals, you can easily destroy them with small switches placed on the walls all over the room.
Lavanthor
The tank turns Lavanthor with his back to the group so that they are not hit by his ” Flame Breath”. If there is a Paladin in the group, he activates the ” Fire Resistance Aura” for the fight. Also, get out of the “Lava Burn.”
Erekem
Erekem arrives with two companions. Make sure that you don’t eliminate the companions first. Otherwise Erekem will get a Windfury-Buff and destroy your party in seconds.
Moragg
The healer pays attention to which player is affected by rays and heals him sufficiently. The faster you finish the boss, the better. Because if the fight takes too long, the “Corrosive Spit” debuff will stack up too high and cause enormous damage.
Xevozz
The tank pulls Xevozz away from the two summoned pugs. These pugs deal damage to the group and strengthen Xevozz. After that, you’ll have to kite the boss down the stairs. If he teleports all the players to him, you have to move away quickly.
Zuramat der Vernichter
The healer must cast a lot of group healing on this boss. The player with the “Void Connection” destroys the summoned void guards. However, if you follow this heroic dungeon guide for WotLK, this boss will be a breeze.
Cyanigosa
All players stand to the side of Cyanigosa. Always get out of the blizzard. When Cyanigosa teleports all players to himself, there is an Aggroreset. The healer pays attention to the damage from the “Uncontrollable Energy”.
Utgarde Keep
The entrance to the particularly popular Utgarde Castle dungeon is located in the middle of the Howling Fjord. Immediately at the beginning, you”ll defeat the two groups with AoE-Damage. If the healer or the tank is good equipped, you can even take on two groups at once. However, the tank should tank the mops first.
Overview
![]() Emblem of Triumph: 3
Emblem of Triumph: 3
![]() Time required: 20 minutes
Time required: 20 minutes
![]() Item-Level: 200
Item-Level: 200
Prince Keleseth
Once you have fought your way past the group, you will meet the first boss, Prince Keleseth. He summons skeletons in the middle of the fight, which you must destroy. A random player will be put into a frost tomb every now and then, incapacitated and taking damage. You have to hit this player (12,000 hit points) to free him. Also, the group gets permanent Shadow Bolt, which the healers have to compensate for.
Dalronn and Skarvald
On the way to the next boss, you have to defeat many enemies. Again, AoE spells can help you here. The enemies on the way to the boss have special abilities. They can blind you and place a bomb behind your feet. That’s why you should defeat these enemies first. The fight against Dalronn and Skarvald is dominated by the myth that both have to die at the same time. But this is not true! Whoever dies first will reappear as a ghost. In this form he is then neither tankable nor defeatable. The fight is only over when the second of the two has been defeated. Kill Dalronn first, as he is less troublesome as a ghost than Skarvald. The latter constantly charges at distant players during the fight. So stand close to the tank.
Ingvar the Plunderer
We continue up a few steps into the fresh air. There the next group of vrykuls and wolves is already waiting, but this one is also easily wiped out by area damage. Next comes a Vrykul on a protodragon from the air. After one last group of enemies, we finally get to the final boss. In the first phase, this boss is fought with its back to the group. His “Dark Smash” and “Cleave” do a lot of damage, so the group must stand at least 10 feet away. After he dies, he is revived and the second phase begins. The healer must be careful not to be interrupted by the “Wavering Roar”, otherwise he will be forced to pause for six seconds.
Drak’Tharon
Continuing in this WotLK heroic dungeon guide with the dungeon Drak’Tharon. The entrance to Drak’Tharon is located between the Grizzly Hills and Zul’Drak. On the way to the first boss, you will meet only unspectacular groups of enemies. However, you have to make sure that you get out of the pools that appear on the ground early enough. Because these do great damage.
Overview
![]() Emblem of Triumph: 4
Emblem of Triumph: 4
![]() Time required: 25 minutes
Time required: 25 minutes
![]() Item-Level: 200
Item-Level: 200
Trollgrind
Simply kill Trollgrind quickly, otherwise the buff he gets from “Consume” will stack and his damage will increase. The healer must always keep a close eye on all party members, as Trollgrind’s “Corpse Explosion” can do some serious damage from time to time.
Novos the Summoner
Follow the path of the instance, past a few spiders and you’ll be at the boss Novos. At the beginning he is immune to damage. From the stairs, adds permanently stumble into a room that you have to knock down. Only when you have defeated the four wizards who run into the room one after the other on the right and left, the fight starts. Avoid contact with “Arcane Field” and the “Blizzard” while the healer has to be prepared for some group damage. In addition, enemies will join the fight, but they can be easily eliminated with area damage.
King Drek
A few groups of opponents further on, the dinosaur King Drek is waiting for challengers. First of all, kill the small dinosaurs in such a way that King Drek is not baited. The fight against him is not so easy. He often knocks you out with his roar for four seconds, while the tank continues to get damage. The healers will have to work very hard here.
The Terrace
After King Drek, go up a few steps to a terrace. Several groups of enemies are waiting for you there. You can easily eliminate the first group with area damage. After a second staircase, however, a group of trolls are waiting for you who are much stronger. These resurrected death knights of the Drakkari cast ” Escape” and prevent reasonable fighting. Some groups are already wiped here, because the healer was chased down the stairs. So: Everyone should stand close to each other.
The Prophet Tharon’ja
Once in combat, the Prophet casts “Decay Flesh”, turning all players into skeletons. Everyone now gets a new action bar with the abilities Deadly Strike, Taunt, Bone Armor, and Touch of Life. It’s important that you never use Taunt without Bone Armor, otherwise you’ll be in danger of taking tremendous damage. After a short time, all players are transformed back. Also, you have to get out of the rain of fire and the green soup. With good group healing, however, all players survive.
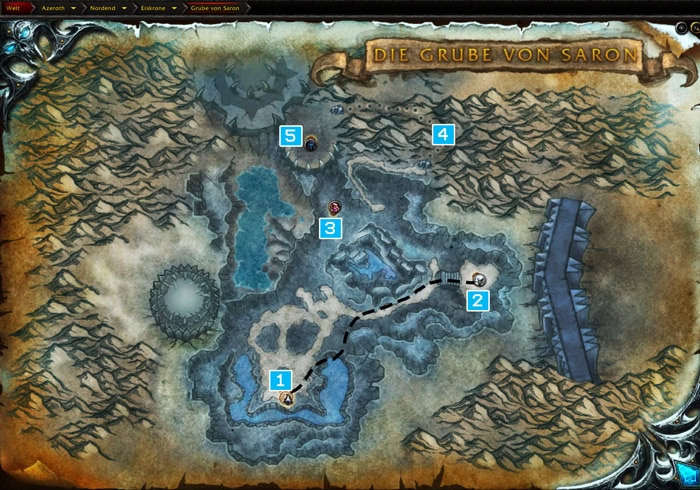
Pit of Saron
Before you can enter the Pit of Saron, you have to complete the Forge of Souls successfully. You can read a detailed guide to the heroic dungeon Forge of Souls in WotLK Classic a bit further down in the text. The entrance to the Pit of Saron is located on the right above the Icecrown Citadel. There is a long corridor leading into a hall. You have to take the gate to the right of the entrance.
Overview
![]() Emblem of Triumph: 3
Emblem of Triumph: 3
![]() Time required: 20 minutes
Time required: 20 minutes
![]() Item-Level: 232
Item-Level: 232
The first steps
The first enemies are easy as pie, then it gets a bit more difficult on the way to the first boss. Keep to the right as shown on the map above. After you have killed the enemies on the way, you are already at the first boss.
Forgemaster Garfrost
Forgemaster Garfrost casts a wave-like aura called “Permafrost” throughout the battle. It splits every two seconds with each use and causes increasing damage. You can get rid of this aura by hiding behind the rocks that Garfrost throws.
Ick and Krick
Movement is very important here. Ick follows a selected player from time to time (watch out for the arrow above your head). If the player is caught up, he dies from a heavy kick. In addition, Ick occasionally generates a “poison nova” that is deadly to bystanders. This nova will be announced, however.
The Tunnel
The group runs to the middle of the tunnel, while the tank binds all the mobs along the way. It is important that no one but the tank creates unnecessary aggro while running. Therefore, healers and DD’s first wait until the tank has aggro on all enemies including the large elemental. Then the group defeats all enemies and it continues in the same style to the tunnel exit. In the tunnel you are often threatened by falling ice shards. You can recognize them by the ice surface on the ground.
Scourgelord Tyrannus
While the boss Tyrannus jumps off his dragon, the tank has to pull aggro directly. Raufang casts damaging ice fields that you have to run out of. He also occasionally freezes players. This effect can transfer to surrounding players. Also, Tyrannus gives players the “Overlord’s Brand”. Once you get this debuff, be sure to stop the damage and healing. Otherwise, you will damage the tank or even heal Tyrannus.
Gundrak
You can find the entrance to Gundrak Dungeon on the map of Zul’Drak in the north. This is a very straightforward dungeon. Along a half-arch you’ll encounter three different bosses. You will have to activate the platforms. The final boss is located in the middle of the map.
Overview
![]() Emblem of Triumph: 5
Emblem of Triumph: 5
![]() Time required: 25 minutes
Time required: 25 minutes
![]() Item-Level: 200
Item-Level: 200
Slad’ran
Right at the beginning you will meet this snake boss. He can quickly become dangerous for the group, as a worshipping poison nova is effective. He also summons more snakes, which can best be eliminated by area damage. The whole group gets damage from the Poison Bolt Volleys.
Drakkari Colossus
Follow the instance over a few hills of skeletons and through groups of trolls and snakes. The Drakkari Colossus consumes elementals at the beginning, then in battle a large elemental appears that you have to fight. The colossus itself hits hard, but the elemental is the real enemy. It creates puddles of mojo that you have to run out of. It also charges random players, who then suffer damage from the mojo.
Moorabi
Moorabi is a troll who actually wants to turn into a mammoth. However, you should prevent this with interrupt spells. In the mammoth form he deals much more damage and has nasty abilities that make the fight even harder. The less health Moorabi has, the shorter his mammoth transformation spell time. So, it becomes more and more difficult to interrupt him.
Eck the Ferocious
Behind Moorabi is a passage to another boss (only in heroic mode). Eck the Ferocious comes out of the water at the end of the stairs. Before that, however, you have to defeat a few enemies for him to appear. He can only use poison attacks and is relatively harmless, unless you need more 90 seconds to defeat him. Then he goes into a frenzy and does significantly more damage.
Gal’darah
Before Gal’darah gets his ass kicked, kill a few unpleasant enemies. Then the tank grabs Gal’darah and tanks him far back around the room. While doing this, all other players keep their distance. A rhinoceros spirit occasionally charges at individual players. These players are then pushed back. When Gal’darah transforms into a rhino, he occasionally impales a random player. This generates a lot of damage, in addition, this player is also incapacitated. If it is a healer, the tank must use all survival mechanics. He is then stunned for a whole ten seconds. His “Puncture”, a bleeding effect, takes a lot out of the healer.
Halls of Light (HoL)
You can get to the entrance of the Halls of Light dungeon by going to the northern part of the Storm Peaks. This is a relatively large dungeon. But you do not have to worry, because with our WotLK heroic dungeon guide, you are well prepared for it. A total of four different bosses awaits you there. Long distances and many groups of enemies make it difficult to get through.
Overview
![]() Emblem of Triumph: 4
Emblem of Triumph: 4
![]() Time required: 30 minutes
Time required: 30 minutes
![]() Item-Level: 200
Item-Level: 200
General Bjarngrim
The general patrols up and down the entire front area with two companions. Orient yourself to the right and eliminate the first two groups of dwarves to clear the way for the fight. The general gets the charge “Electricity” during his patrol, which makes him significantly stronger. He will lose it again if there is no glowing material under him on his patrol. Then you’ll have to pull him. He is a real warrior who has many abilities. Besides “Whirlwind” and “Cleave” he also has abilities like “Spell Reflection”. It is important to take out his two companions first, because they do the most damage. He also loses the electric charge if he doesn’t already have it. Unless you want to get the “Lightning Struck” achievement.
Volkhan
A small hurdle on the way to the next boss is the room with the elementals. All players get a debuff that increases the fire damage taken. The tank catches all the enemies, while the DD’s carefully work with AoE damage. If the enemies switch to a player in the process, the player usually dies. Volkhan stands at a forge. If he is attacked, he summons several golems to assist him in battle. If you attack them, they become slower and slower as their health decreases. Until they freeze shortly before. Now Volkhan will cast “Shattering Stomp” so that the golems explode.
Ionar
If a player receives the “Static Overload”, he must move away from his fellow players. Everyone should try to dodge the ” Ball Lightning” while doing so. Ionar transforms into Arcane Lightning via “Dispersion”, which slowly creeps towards the players. You should avoid him in any case. Once Ionar is back in its original form, you can continue.
Loken
Unlike many other WotLK heroic dungeon guides, we recommend you stay close with your party here. The only exception to this rule are situations where he casts Lightning Crash Nova. In that case, everyone will have to move away from each other quickly. The healer has to compensate a lot of group damage in the last seconds.
Halls of Reflection (HoR)
To gain access to the Halls of Reflection, you first have to complete the dungeon the Pit of Saron and the quest series associated with it. The entrance is located just across from the Pit of Saron. This is the hardest 5-man instance in the game. With an attentive tank, powerful DD’s as well as a good healer you have a chance here at all.
Overview
![]() Emblem of Triumph: 3
Emblem of Triumph: 3
![]() Time required: 20 minutes
Time required: 20 minutes
![]() Item-Level: 232
Item-Level: 232
The waves of enemies
If a player owns the quest series for the legendary sword Quel’Delar, he can bring the sword on the altar to life and fight it right at the beginning. Otherwise, here’s how it starts. After experiencing the event between Jaina (Alliance) / Sylvanas (Horde), Uther and the Lich King, the Lich King disappears. He leaves behind his companions Falric and Marwyn. Large waves of enemies also await you. These consist of mages, hunters, priests, foot soldiers and mercenaries. It is common in many groups to stand on the left or right corner. This way you can see the monsters coming and have everything in view. Then take out the priests and mages first, they cause the most damage. The tank will have his hands full to draw the aggro on him. Also make sure that all magic effects are removed in time.
Falric and Marwyn
After each four of these waves of enemies, you will fight first Falric and then Marwyn. Falric’s nastiest ability is his fear effect ” Defiling Horror”, which deals an additional 4x 4000 shadow damage. So, some cloth wearer loses 70 to 80 percent of his health here. He casts the debuff “Hopelessness” on all players, which reduces player damage and healing. The debuff increases to 75 percent, making it harder and harder to heal players who have been struck by fear. So, this fight will put your skills to the test.
After the second wave of enemies, it’s Marwyn’s turn. His “Obliteration” ability occasionally hits the tank with 20,000 points of damage. So, the healer has to watch out for a huge damage. All players move out of the Well of Corruption, otherwise the damage taken will be increased. As soon as the boss uses the spell “Shared Suffering”, you must immediately remove this effect.
The escape from the Lich King
After an intermediate opponent, you meet the Lich King, from whom you must flee. Jaina/Sylvanas stands by the group. The Lich King casts barriers, which she removes. In the process, the Lich King summons undead enemies that pounce on the group. Let’s be honest: one of the most difficult game elements of all 5-player instances is waiting for you. The tank has to keep as many enemies to himself as possible, the healer keeps an eye on both the tank and the group. The damage classes can’ t sleep, because every wasted second could cost you the victory. The waves of enemies become more numerous from barrier to barrier. Remove the “Lumbering Monstrositys” from the group, because they do a lot of area damage. If the Lich King gets too close to your group, he will wipe them with Frostgram.
Halls of Stone (HoS)
The Hall of Stone is an instance full of rune dwarves and giants. The entrance to the Halls of Stone (HoS) is located in the northern part of the Storm Peaks. Keep to the right to begin and fight your way through to the Krystallus.
Overview
![]() Emblem of Triumph: 4
Emblem of Triumph: 4
![]() Time required: 25 minutes
Time required: 25 minutes
![]() Item-Level: 200
Item-Level: 200
Krystallus
Those who have experienced the fight against Gruul in TBC know what to expect here. In this guide, however, we’ll show you what to expect in the heroic dungeon in WotLK. Krystallus regularly hurls players across the room. Shortly after, you turn to stone and explode. The closer you are to other players, the more damage you will take. So the rule is, move around the room! The healer definitely has his hands full here. You also have to pay additional attention to the spikes on the ground, they cause a lot of damage.
Maiden of Grief
Jump down behind Krystallus and come to the beginning of the passage. Keep to the right and run along the long corridor to the Maiden of Grief. This is a small version of the Maid of Virtue from Karazhan. The healer will also have to keep an eye on all players, because there is a lot of shadow damage. The healer is also the focus of attention in other ways. The attack ” Shock of Sorrow” makes all players unable to do anything for ten seconds. Only damage can free you from this stun.
Tribunal of the Ages
Now walk the long corridor back to the center of the dungeon. Then head west. Talk to Bronzebeard, who will then run to the Tribunal of the Ages. You and your group will have to protect him. Several groups of enemies will follow. The tank must catch all the groups, while the healer concentrates on all the players. These groups of enemies should be eliminated as quickly as possible.
Sjonnir The Ironshaper
After the fight you can talk to Bronzebeard again. Afterwards, he will run back to the beginning of the dungeon and open the door to Sjonnir. Since Sjonnir casts the ability “Chain Lightning”, you should stand apart. Also, move away from the lightning rings as soon as they appear. If a player has the debuff “Static Charge”, he must move away from the group. The enemies coming along, are caught best of all by the tank and are finished off directly. In the end, Sjonnir goes into a frenzy and the healer has to pay close attention.
The Nexus
The Nexus is a very worthwhile instance, because you can get 5 tokens in just 20 to 25 minutes. With good equipment even faster. The entrance to the Nexus dungeon is located in the Borean Tundra on Kaltarra Island.
Overview
![]() Emblem of Triumph: 5
Emblem of Triumph: 5
![]() Time required: 25 minutes
Time required: 25 minutes
![]() Item-Level: 100
Item-Level: 100
The Extra-Boss
At the beginning, you choose the left corridor, kill the dragon patrol and follow the instance. Soon you’ll come across a curved corridor. There you will find frozen enemies that you have to defeat. Among them is Commander Stoutbeard on the Horde side and Kolurg for the Alliance. The commander casts Fear and Whirlwind and charges at single players. So the healer from your group has to be careful. In case the commander directs you into the enemy groups with fear, a wipe is very likely.
Grand Magus Telestra
Only a few meters further, the next boss is already standing on the right side in a round room. Bait the surrounding enemies, then you can deal with the lady. To describe her magic arsenal in detail would lead too far. But you need to know the following. The whole group takes a lot of damage, so the healer has to be careful. Twice in the battle she splits into aspects that need to be destroyed. She also whirls the whole group through the air, dealing damage constantly. Despite many abilities, there is only one tactic – defeat as soon as possible!
Anomalus
Across from Grand Magus Telestra’s room, the path continues. Follow the path further and fight your way through harmless groups of enemies. After that jump down into the big room to the arcane enemies and defeat them. Anomalus is now standing there on the platform waiting for you. In battle, he summons a “Chaotic Rift”, which must be destroyed quickly, because Anomalus will be immune for so long. Also, Mana Fiends appear from the crack, which could disrupt the fight.
Ormorok
Back to the platforms, keep left and this will take you to a path with elementals. Fight your way through here until you reach Ormorok. Ormorok hits the tank hard, but also uses spikes on the group that shoot out of the ground. Small plants will also appear, pouncing on the healer and trapping him with their roots. A player from the group should take care of these plants. For those who are firmly rooted, can not move from the spikes.
Keristrasza
Run through the tunnel and jump down. Keep to the left, because that way you’ll get directly to the final boss. You have to unfreeze Kristraza by activating the orbs. In battle, the “Intense Cold” is going to be the big problem. It is an ability that stacks up, doing more and more damage. To get around this, you need to move. So you can’t just stand still. The melee fighters should also always stand to the side of the boss. Priests and paladins be sure to remove the crystal chains from the other players. This way, even this boss will be a piece of cake with the heroic WotLK dungeon guide.
The Oculus
It is probably the most controversial instance in all of WotLK. Many call this dungeon, the worst or even the most boring instance. Unlike in all other dungeons, here you have to fly on dragons. With our heroic dungeon guide for WotLK, we will show you how to complete this dungeon with ease. A whole six emblems are waiting for you as a reward and that in under 20 minutes. The entrance to the dungeon “the Oculus” is located in the Borean Tundra in the northwestern part of the map.

Overview
![]() Emblem of Triumph: 6
Emblem of Triumph: 6
![]() Time required: 20 minutes
Time required: 20 minutes
![]() Item-Level: 200
Item-Level: 200
Drakos the Interrogator
Follow the instance progression, killing the groups of dragons one by one. Click on the portal at the end of the corridor to teleport to the first boss. Drakos the Interrogator summons unstable spheres that move on this platform and explode after a while. Avoid these enemies. From time to time Drakos pulls all the players towards him and casts “Trampling Stomp”. This will throw all players away and generate some damage. Healers with group healing abilities again have a slight advantage here. Overall, though, this is an easy fight.
Varos Cloudstrider
Here you have to pay attention to which orbs Varos is focusing on. After a few seconds, a deadly lightning bolt will appear there. Therefore, stay close to the boss, so you can quickly dodge the lightning attacks. From the air, an “Arcane Death Ray” moves along the ground. You have to dodge it as well.
Mage-Lord Urom
After three fights, you finally catch him in the middle of the Oculus. His Frost Bombs do a lot of damage in combination with the Frost Debuff. Players with “Ticking Time Bomb” must stay away from the other players. If Urom casts Arcane Explosion from the center, everyone must get cover behind a rock. Otherwise, this attack does 12,000 arcane damage.
Ley-Guardian Eregos
You”ll fight this battle on a dragon. One bronze dragon constantly casts Temporal Rift, while the other shoots lances. The Ruby Dragon uses dodging maneuvers. If the party members receive too much damage, he casts “Martyrdom”. The Emerald Dragon maintains his Poison Stack on Eregos. The other heals with Dream Funnel in the process. Thus, the Bronze Dragon is a damage dragon, the Ruby Dragon is a tank dragon, and the Emerald Dragon is a healing dragon. The breakdown is as follows, one Tank Dragon, two Damage Dragons and Healing Dragons where only one of them heals and the other one does damage.
Trail of the Champion
In the Trail of the Champion Dungeon, you’ll find yourself in an arena. Here you have to defeat three different bosses and also different groups of opponents. The entrance to the dungeon “the trial of the champion” is located in the northern part of the map Icecrown.
Overview
![]() Emblem of Triumph: 3
Emblem of Triumph: 3
![]() Time required: 20 minutes
Time required: 20 minutes
![]() Item-Level: 219
Item-Level: 219
The Champions
At the beginning, equip a lance and grab a mount. At first, normal enemies appear three times, which can be easily defeated. Out of a total of five possible enemies per faction, three grand champions step forward. You’ll need to use all of your Argent skills to do this. Keep your shield up with three charges. Also, use shield break on the target as many times as possible. If you get knocked off your horse, quickly run to the edge and grab another one. Everyone should focus on the same target. Downed enemies slowly run back to their mounts and saddle up again. To slow them down, you can ride over these enemies. After this fight, you will need to change your lance back to your normal weapons. The three champions use the ability of the classes Rogue, Warrior, Shaman, Hunter or Mage. You should destroy them in this order.
Argent Confessor Paletress and Eadric the Pure
Next, either Argent Confessor Paletress or Eadric the Pure awaits you. For both, however, you have to defeat the three groups of opponents first. Eadric occasionally casts “Rays,” in which case all players should turn away for a moment. His “Hammer of Justice” produces a lot of damage, but hardly puts the healer in trouble. The fight against Paletress is a bit more difficult. She generates a lot of Holy damage to the entire party. She is also immune for a short time at about 25% health. While doing so, she summons random memories. Follow this WotLK heroic dungeon guide and quickly focus on these memories and then destroy Paletress.
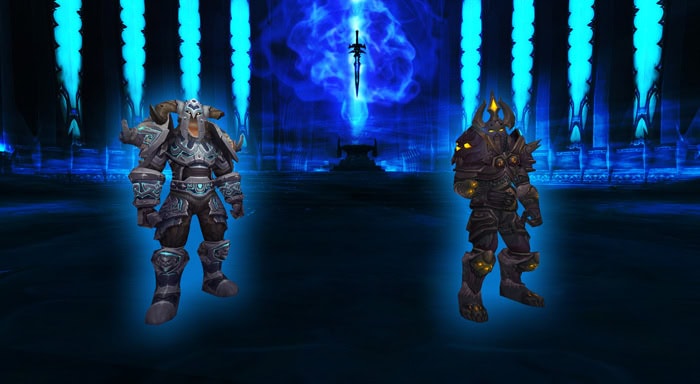
The Black Knight
This fight has three phases. In phase 1 you fight against him and a ghoul. The tank keeps both of them busy. The only dangerous thing here is the attack ” Death’s Respite”. This is cast on a random player and causes a lot of shadow damage. In phase 2, the knight rises as a skeleton and summons an army of the dead. Everyone should stand together in this phase so that the tank can pull aggro on them. Later, however, everyone needs to get away from the ghouls, as they will explode. In phase 3, everyone should use their CD’s. Here you need to kill the black knight as soon as possible. In his spirit form he deals significantly more damage.
The Forge of Souls
The Forge of Souls is the easiest and also the shortest of the three instances of Frozen Halls, making it perfect for quick loot. The entrance to the Forge of Souls is located in the upper right corner of the Icecrown Citadel. It is the left portal. You can also earn some Gold in WotLK with the Battered Hilt.
Overview
![]() Emblem of Triumph: 2
Emblem of Triumph: 2
![]() Time required: 15 minutes
Time required: 15 minutes
![]() Item-Level: 232
Item-Level: 232
Bronjahm
The instance progression is completely linear. On your way through the first groups of enemies, you will occasionally be surprised by a skull. You have to move away from it, because it will explode. Bronjahm the first boss, casts ” Consume Soul” on a random player. This makes a ghost appear that slowly moves towards Bronjahm. When he gets to him, he heals him slightly. Thus, the focus should be on defeating the ghosts as soon as they appear. His ” Soulstorm” becomes dangerous, which forms a circle in the room when he has 35 percent health points or more. Now all players have to get close to the boss. Through “Fear” he tries to lure the players into the soulstorm.
Devourer of Souls
After that, a passage will lead you to a tunnel with spectral guards. You will then come to the last boss. The Devourer of Souls deals high damage to the tank with his attack “Phantom Blast”. He also uses the ability “Mirrored Soul”. Then the damage you do on the boss is directed to the player with “Mirrored Soul”. At the end of the fight, he casts another beam and turns 90 degrees. Anyone who stays in it for more than two seconds dies instantly.
The Culling of Stratholme
In this instance, you’ll fight alongside Arthas and help him clean up the infested Stratholme. For all Warcraft 3 players, this event should be familiar. However, you can relive this story in the Caverns of Time in World of Warcraft Wrath of the Lich King. The entrance to the Culling Stratholme dungeon is located in the Caverns of Time in Tanaris.

Overview
![]() Emblem of Triumph: 5
Emblem of Triumph: 5
![]() Time required: 25 minutes
Time required: 25 minutes
![]() Item-Level: 200
Item-Level: 200
Meathook
Once again, you have to survive waves of attacks. The waves of enemies consist of patchwork constructs and ghouls, as well as necromancers. None of these groups are really dangerous. You can easily finish these groups off with area damage. After the fifth wave of enemies, the Meathook will appear. The boss can stun individual players with his Chains or interrupt spells with the “Sick Eject”.
Salramm the Fleshcrafter
After another five waves of enemies, Salramm the Fleshcrafter appears. He is relatively harmless, summoning ghouls from time to time. These ghouls can also explode and cause damage. With a reasonably well-equipped healer, however, this is not a problem.
Chrono-Lord Epoch
After you’ve killed a few groups of dragons in the building, you’ll meet the Chronolord. He has several time-delaying abilities, so healers with strong HoTs have an advantage here as well. The “Curse of Exertion” increases the mana cost by double. Mages should then remove this curse if present.
Infinte Corruptor
Now fight your way through a passage with many undead enemies. But don’t take on too much, some have already overdone themselves here. The tank must have an eye on the back of his neck and always look at the healer. If the tank only focuses on the group in front of him, the fight will be over quickly. The Infinte Corruptor is located in a side alley and can be attacked in a period of less than 25 minutes. He drops the reins of the Bronze Dragon.
Mal’Ganis
He is already waiting for you on the crusader square. The tank turns him away from the group. Nevertheless, the group is attacked, with “Sleep”, “Mind Blast” and “Vampiric Touch”. You should definitely remove spell Vampiric Touch. Otherwise Mal’Ganis can heal himself and the fight will drag on.
Utgarde Pinnacle
Utgarde Pinnacle is the second dungeon in the Utgarde Complex. Be prepared for groups of undead enemies and Vrykul. The entrance to Utgarde Tower is located in the middle of the Howling Fjord.
Overview
![]() Emblem of Triumph: 4
Emblem of Triumph: 4
![]() Time required: 25 minutes
Time required: 25 minutes
![]() Item-Level: 200
Item-Level: 200
Saval Sorrowgrave
Kill the first groups and leave the first patchwork horror behind. Once you have fought your way through a few groups, the first boss will appear. Svala Sorrowgrave casts harmless fireballs and gets into the air. Then a player is sacrificed on the altar. Now quickly knock down the ritual channeler that appears. This will free the player from the sacrifice.
Gortok Palehoof
In Gotok Palehoof’s room there are also four oversized enemies. One after the other, they break free from their rigidity and attack the group. Except for Rhinoceros, which works nasty bleeding effects, are hardly worth mentioning. The fight against Gortok is itself healing-intensive, but doable. The tank has to turn the boss away from the group. You also need to defeat the boss as soon as possible, otherwise it will do more and more damage.
Skadi the Ruthless
The fight against the boss has several pitfalls. For one thing, all players have to get out of the ice patches that his companion Grauf casts. Also, he must be taken from the sky. You do this with the harpoon when Skadi is nearby. Three shots are needed to get him out of the air. If he climbs down from the dragon, it becomes critical for a short time if the tank doesn’t pull aggro immediately. Otherwise, the boss is relatively easy.
King Ymiron
The fight against King Ymiron is very dynamic. He can use four different abilities. The tank grabs the king, all other players spread out in the room. If possible, the healer always casts HoTs on the tank, so he can survive the stun phases. These phases appear whenever Ymiron goes to one of the boats. Two times he deals Ymiron shadow damage to the group, once he summons four ghosts and once he gets the Ghost Strike ability. This increases the damage taken and is stackable. This is very dangerous for the tank and must be healed.
If you want to know how to solo these dungeons on Heroic with your Death Knight, check out our Death Knight Solo Guide.